Light is essential for access, research, and display, but also a leading agent of irreversible damage for cultural heritage materials. Cumulative exposure from visible light causes chemical deterioration, fading, and embrittlement, especially for organic and color‑sensitive materials. For these reasons, measuring and monitoring light precisely, using a light meter and UV meter, is central to preservation and preventive conservation planning.
This blog post explores why, how, and where to use a light meter with recommendations on ideal light levels for exhibition cases, storage rooms, and workspaces or processing areas. It also underscores the importance of tracking cumulative exposure via lux‑hours and UV levels.
Why Measure Light?
Light is one of the most persistent and damaging forces affecting collections, especially those made from organic materials like paper, textiles, photographs, and natural dyes. The challenge is that light damage is both cumulative and irreversible. Once a letter’s ink fades, no treatment can restore it to its original appearance.
A big part of the risk comes from how light interacts with collections over time. Even moderate light, left on for long hours day after day, can cause more harm than a short burst of brighter light. This is why light measurement is so powerful: it turns vague concern into concrete data that can guide decisions about display, storage, and handling.
When you use a light meter, you’re usually measuring visible light in lux, the standard unit for illumination. One lux is equal to the amount of light from one candle shining on a one-square-meter surface from a distance of one meter. In practical terms, lux tells you how bright the light is at the surface of your object. A fragile watercolor, for example, might be fine at 50 lux, but will fade much faster at 200 lux.
Visible light is what our eyes can detect, roughly wavelengths from 400 to 700 nanometers. While essential for seeing objects, it still causes fading and chemical change in sensitive materials over time.
Ultraviolet (UV) light, on the other hand, is invisible to our eyes but far more aggressive in causing damage. UV wavelengths are shorter (about 100–400 nanometers) and carry more energy, which accelerates deterioration by breaking chemical bonds in organic materials. UV exposure can lead to embrittlement, yellowing, and rapid fading, particularly in paper, photographs, and textiles.
If you have a basic visible light meter, you can track lux levels and adjust lighting schedules, rotate sensitive items more often, or relocate vulnerable materials away from bright spots. If you also have access to a UV meter (or a combined visible/UV meter), you can detect hidden hazards such as unfiltered fluorescent bulbs or sunlight leaks that look harmless but emit high UV levels. Even without UV measurement tools, focusing on visible light is still worthwhile. Many effective UV-reduction steps, like avoiding direct sunlight, installing UV-filtering film on windows, or replacing fluorescent fixtures with LED lights, can be implemented without exact UV readings.
If you don’t have a light or UV meter (or even if you do) Blue Wool cards are a simple, inexpensive way to track cumulative light damage over time. These cards contain strips of dyed wool, each with a known sensitivity to fading. By placing a card in a location with half covered and half exposed, you can visually see how much fading occurs over a set period, from weeks to months. Comparing the exposed and covered portions helps you judge not just the intensity of light, but its long-term impact. While not precise like digital lux-hour tracking, Blue Wool cards help visualize damage that might otherwise be invisible until it’s too late. This can be especially useful in identifying problematic spots in exhibits or storage, like areas near case lights, unshaded windows, or uneven gallery lighting. If fading occurs quickly on the Blue Wool scale, it’s a clear signal to reduce light levels or rotate materials more frequently.
In short, measuring light, whether with a meter, Blue Wool cards, or both, helps you understand what your collections are actually facing. It replaces guesswork with evidence, supports better lighting policies, and lets you make changes that extend the life of your collections, even if those changes are gradual.
Measuring Visible Light
Using a light meter doesn’t require advanced training, and once you’ve used it a few times, it becomes second nature. What’s important is to measure light as the object experiences it. That means placing the meter at the same level and angle as the object, whether it’s on a shelf, inside a display case, or laid out on a worktable.
In an exhibit setting, take readings inside each case, especially near the items that are most sensitive to fading, such as textiles, watercolors, or historic photographs. Check both the center and edges of the case to make sure light levels are consistent and not overly concentrated in one area. These readings will help determine if lights need to be dimmed, diffused, or repositioned. Even small adjustments, like tilting a fixture slightly or adding a simple filter, can significantly reduce exposure.
In storage areas, the goal is to keep objects in the dark as much as possible. Lights should only be on when someone is in the room. Use the meter to check what happens when lights are on, especially in places where shelves are close to ceiling fixtures or near windows. If you find that materials are exposed to higher-than-expected light levels during access, consider low-cost options like installing motion sensors, switching to task lighting instead of full-room lighting, or simply posting reminders to staff and volunteers to switch lights off when leaving.
In processing areas, reading rooms, or cataloging workspaces, light levels are often higher because people need to see details clearly. This is generally okay for short-term exposure, but it’s still worth measuring and being mindful of how long items are exposed. When possible, limit the time that sensitive materials are left uncovered under direct lighting, and store them away or under protective enclosures when not actively being used.
Over time, routine spot checks with a light meter will help staff develop a clear picture of how light behaves across your building. It becomes easier to see patterns, like that one case near the window that gets much brighter in the afternoon, or that one shelf that’s directly under a ceiling bulb. This insight gives institutions the confidence to make informed changes, even with a small team or budget.
Using a Light Meter in Real-World Settings
For many smaller institutions, the idea of consistently monitoring light across exhibit, storage, and work areas can feel out of reach. But in practice, just a few well-placed light meter reading done periodically can help staff make more confident, cost-effective decisions about how to protect collections. You don’t need specialized training or expensive technology to get started. A basic handheld light meter (even one borrowed or shared among local organizations) can provide incredibly useful insight.
Below are three realistic scenarios where measuring light can directly improve preservation practices.
1. Preparing an Exhibit
When setting up a new exhibition, one of the simplest and most effective things you can do is check the light level directly where the object will sit. Place your meter inside the display case or on the object mount and see what it reads. For particularly sensitive materials like photographs, textiles, or watercolors, aim to keep the level at or below 50 lux. For sturdier items like ceramics or metal, up to 300 lux may be acceptable. This publication about lighting sensitive artifacts from the Conservation Center for Art & Historic Artifacts has more details.

If the readings are too high, small adjustments like angling the light fixture, using a diffuser, or changing the type of bulb can often bring them into range. Try turning off unnecessary overhead lights or using dimmer bulbs. If you don’t have exhibit lighting control systems, consider using window shades, cardboard cutouts, or even plain white fabric as a diffuser to soften light.
Some institutions use dataloggers to track cumulative light exposure over time. If that’s not in your budget, you can still estimate light exposure by noting lux levels and recording how long the exhibit will run each day. This rough “lux-hours” calculation can help guide decisions about whether to rotate sensitive materials or give them a rest after a certain period.
2. Walking Through Collections Storage
Storage spaces should be dark most of the time. A simple walk-through with a light meter, ideally during hours when staff are accessing the collection, can reveal unexpected risks. Measure in aisles, near windows, and under ceiling fixtures. If your meter reads above 150 lux in areas where collections are regularly stored, you may want to take action.
In many cases, simple solutions can make a big difference. Could materials be stored inside boxes to be protected from light? Can lights be turned off when not in use? Would task lighting work better than overhead fixtures? If motion sensors or timers are out of budget, even signage reminding staff and volunteers to turn lights off can improve conditions.
If your facility still uses fluorescent lighting or has daylight filtering into storage rooms, and you have a UV meter available, check for elevated UV exposure. If not, focus on reducing total light exposure however you can, especially in areas used frequently for retrieval or processing.
3. Working with Collections in Reading or Processing Areas
In reading rooms or cataloging spaces, good lighting is necessary for staff and researchers to see what they’re doing. These areas often have light levels between 200–300 lux, which is generally fine for short periods. But problems can arise when sensitive objects are left out under bright lights all day.
Use a light meter to check how bright your work surfaces really are. If a desk is well-lit, just make sure sensitive items are only exposed for as long as necessary. Cover them or return them to boxes when not in use. If nearby shelves or carts are holding uncovered collections, spot-check those areas too, and move materials out of direct lighting if possible.
Where possible, limit exposure by using portable desk lamps, pulling shades during bright hours, or moving fragile items away from the brightest parts of the room. Low-cost solutions like using archival folders as temporary light shields can go a long way.
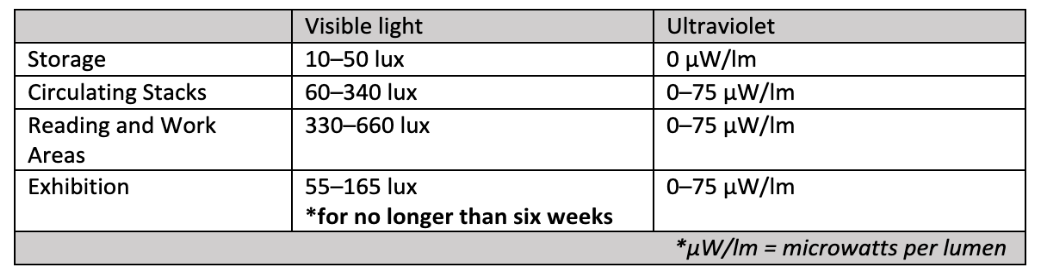
Recommended Light Levels for Common Settings
Even without advanced monitoring tools, institutions can take basic light readings and use the following table to guide decisions about safe conditions for display, storage, and handling.
A Few Common Challenges, and What to Do About Them
Light varies more than expected
Even small spaces can have big differences in brightness. The center of a case may read much lower than the edge. Take measurements in a few locations and average the results or use the highest reading as a guide.
Meter seems off or unreliable
Over time, light meters may drift out of calibration. If yours seems inconsistent, try comparing it to one used by another institution or preservation consultant. Even an imperfect meter can help you spot major issues.
No UV meter? No problem.
If you can’t measure UV levels, play it safe: avoid direct sunlight, use LEDs, and steer clear of fluorescent lights unless filtered. UV is invisible, but you can still manage it with good practices.
People forget to turn lights off
Create reminders. Simple signage or automatic shutoffs can reduce exposure significantly. Educating staff and volunteers about the impact of light goes a long way.
Pressure for brighter exhibits
If stakeholders want well-lit displays, balance the need for visibility with preservation by adjusting exhibit duration, rotating vulnerable items, or using reproductions when appropriate.
Using a light meter even just a few times a year can help your institution make smarter, more protective choices for your collections. You don’t need expensive technology or environmental control systems to start making a difference. Just by measuring light, comparing it to recommended levels, and adjusting how and when collections are exposed, you can extend the life of your materials significantly.
Additional Resources:
Lighting: Beyond Standards – DHPSNY webinar
Light Levels for Exhibition – CCAHA webinar
Light Exposure for Artifacts on Exhibition – CCAHA publication
Do you have a preservation topic, question, or creative solution you would like us to cover in this series? Reach us by email at info@DHPSNY.org, or connect with us on the DHPSNY Facebook page or DHPSNY Community Facebook Group.